MD5: 999e359dc482aeaea71041122f2b2d6e
Overview
- Release Date: 2025/04
- Support Product: MIC-711-OX4A1
Flash Step
Device Connection
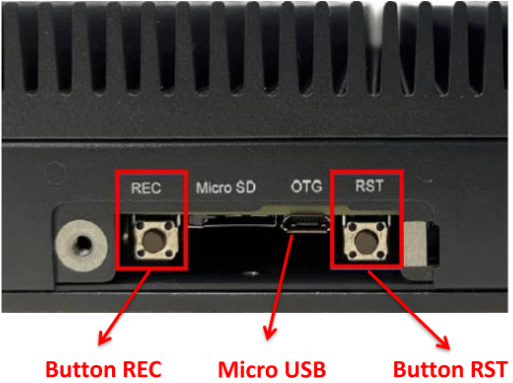
Entering Recovery Mode
-
Power Off
- Make sure the MIC-711 is completely shut down.
-
Connect USB Cable
- Use a USB Type-A to Micro USB cable to connect the MIC-711 (Micro USB port) to your host PC.
-
Prepare to Enter Flash Mode
- Do not power on the device yet.
- Press and hold the
RECbutton.
-
Power On and Reset
- While still holding the “REC” button, plug in the power cable to turn on the device.
- Press the “RST” button once.
-
Hold and Release
- Keep holding the “REC” button for about 5–10 seconds, then release it.
-
On Host PC,verify recovery mode by checking if NVIDIA Corp is detected:
lsusb | grep "NVIDIA Corp"Expected output:
0955:7323 NVIDIA Corp
Start flash BSP
Run Command on Host PC
- Extracted BSP image file
$ cd Desktop/
$ sudo tar -zxvf MIC-711_OrinNX_5.1.2_V1.0.2_SDK.tbz2
- Switch Directory
$ cd Desktop/BSP
- To flash QSPI + NVME SSD:
$ sudo ./tools/kernel_flash/l4t_initrd_flash.sh --external-device nvme0n1p1 -c tools/kernel_flash/flash_l4t_external.xml -p "-c bootloader/t186ref/cfg/flash_t234_qspi.xml" --showlogs --network usb0 p3509-a02+p3767-0000 internal
Note
- Please not use Vitrual Linux as host because there is easily usb problem.
- Please not use USB Hub between host PC and MIC device.
- Please not use account
rootto execute command. - Please attach HDMI monitor to MIC device, until flash process had done and MIC boot in OS